About the Advanced Supply Demand Indicator
The Advanced Supply Demand indicator for MT4 is designed to automatically draw high-quality supply and demand zones directly on the chart.
These zones highlight areas where strong buying or selling pressure previously entered the market, helping traders anticipate potential reactions.
The indicator provides a practical way to identify important support and resistance areas without manual zone drawing.
It is built as a multi-timeframe tool, allowing traders to project higher-timeframe supply and demand zones onto lower-timeframe charts.
For example, zones from the H1 timeframe can be displayed on an M5 chart.
Once price approaches a supply or demand zone, the indicator can trigger alerts.
This helps traders stay prepared for potential setups without constantly monitoring the chart.
For best results, the indicator should be combined with price action or a structured trading strategy.
Free Download
Download the “advanced-supply-demand-indikator.ex4“ indicator
Key Features
- Automatically draws supply and demand zones on the chart.
- Multi-timeframe functionality.
- No repaint behavior.
- Alerts when price reaches key zones.
- Works in trending, breakout, and ranging markets.
- Compatible with all currency pairs and timeframes.
- Easy to use, including for beginner traders.
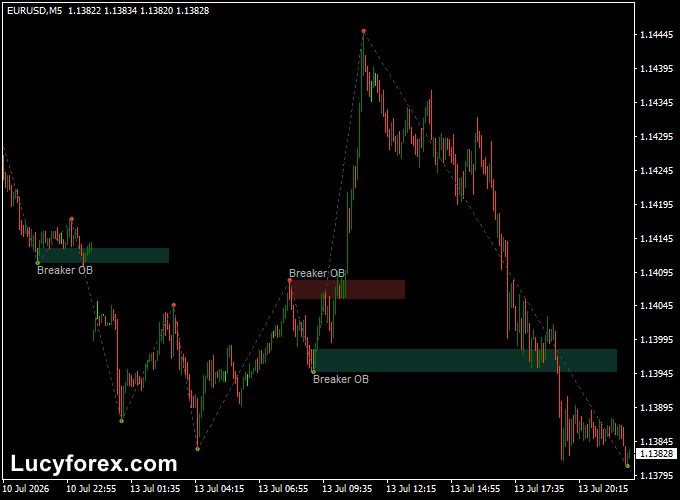
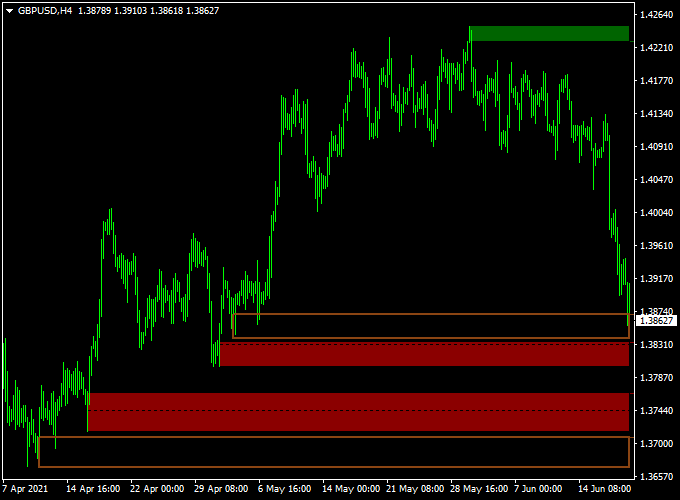
Indicator Chart
Example chart showing the Advanced Supply Demand indicator applied to a forex pair.
The chart displays clearly marked supply and demand zones projected from higher timeframes.
Traders can see how price reacts when entering these zones, supporting decisions around entries, exits, and trade management.
Guide to Trade with Advanced Supply Demand
Buy Rules
- Confirm the market is in an overall uptrend.
- Wait for the price to pull back into a demand zone.
- Look for confirmation using price action or a supporting strategy.
Sell Rules
- Confirm the market is in an overall downtrend.
- Wait for the price to rally into a supply zone.
- Look for confirmation using price action or a supporting strategy.
Stop Loss
- Place the stop loss below the demand zone for buy trades.
- Place the stop loss above the supply zone for sell trades.
Take Profit
- Take profit when the price reaches the opposite zone.
- Apply a personal exit strategy based on market conditions.
Supply & Demand Zone + Scalper Arrows Forex Strategy
This MT4 scalping strategy combines the Advanced Supply Demand Forex MT4 Indicator with the Best Forex Scalping Indicator MT4.
It is tailored for traders who want fast entries and exits, making it suitable for 1-minute to 15-minute charts during active market sessions.
The idea is that supply/demand zones mark significant price reaction points, and the arrow signals give quick confirmation of a momentum shift.
When both align, you get a high-probability scalping opportunity.
Buy Entry Rules
- Wait until the price approaches or enters a red support block drawn by the supply/demand indicator (indicating a demand zone).
- Then wait for a blue arrow buy signal from the scalping indicator.
- Enter a long (buy) trade once the arrow appears within or just after touching the support zone, and you see a small bullish candle forming.
- Place a stop loss a few pips below the bottom of the red support block (or the recent swing low just beneath it).
- Set a take profit target of 8–15 pips (for M1/M5) or 20–25 pips (for M15) or exit when a red arrow (sell) appears, reversing the signal.
Sell Entry Rules
- Wait until the price approaches or enters a green resistance block drawn by the supply/demand indicator (indicating supply zone).
- Then wait for a red arrow sell signal from the scalping indicator.
- Enter a short (sell) trade once the arrow appears within or just after touching the resistance zone, and you see a small bearish candle forming.
- Place a stop loss a few pips above the top of the green resistance block (or the recent swing high just above it).
- Set a take profit target of 8–15 pips (for M1/M5) or 20–25 pips (for M15) or exit when a blue arrow (buy) appears, reversing the signal.
Advantages
- Uses clear visual zones (support and resistance via supply/demand blocks), which give context to price behavior.
- Combines zone-based strategy with arrow signals for confirmation, reducing random entries.
- Specifically designed for scalping: quick entries and exits, small targets, frequent opportunities.
- Works well during high-liquidity sessions when the price reacts to zones quickly.
Drawbacks
- Supply/demand blocks can stay valid for a long time – waiting for arrow confirmation may mean missing the first move or entering late.
- Arrows can lag or produce false signals if the indicator is too sensitive or the zone is weak; hence risk of stop-loss being hit quickly.
Case Study 1: AUDUSD 5-Minute Chart
During the Asian-London session overlap, AUDUSD retreated into a red demand block.
As the price entered the block, the scalping indicator produced a blue arrow.
A buy at 0.6782 with a stop at 0.6770 resulted in a move to 0.6797, achieving 15 pips before a red arrow appeared, and the trade was closed.
The zone held, the arrow gave timing, and the scalped move was efficient.
Case Study 2: USDCHF 15-Minute Chart
In the New York session, USDCHF approached a green supply block.
A red arrow sell signal appeared shortly after the price touched that resistance zone.
A short position was entered at 0.9225, stop was placed at 0.9240.
Price fell to 0.9200 (~25 pips) before a blue arrow appeared signalling a reversal, and the trade was closed.
This example shows how the zone + arrow combo can work on a slightly larger scalping timeframe.
Strategy Tips
- Prefer major currency pairs with tight spreads (EURUSD, GBPUSD, USDJPY, AUDUSD) because scalping demands minimal cost drag.
- Trade mainly during active sessions (London, New York) when liquidity is high and zones are more likely to trigger reactions.
- Use a higher timeframe zone context (for example, H1 or H4) but execute on lower timeframes (M5 or M15) for entry precision.
- Adjust arrow sensitivity if possible: if you get too many false arrows, try filtering by requiring zone touch + candle confirmation before entry.
Download Now
Download the “advanced-supply-demand-indikator.ex4” Metatrader 4 indicator
FAQ
What makes this supply and demand indicator different?
The indicator combines multi-timeframe analysis with automatic zone detection.
This allows traders to work with higher-timeframe zones while trading lower timeframes.
Which market conditions suit this indicator?
The indicator works in trending markets, during breakouts, and in range-bound conditions, making it versatile across different trading environments.
Summary
The Advanced Supply Demand indicator for MT4 offers a reliable way to identify key supply and demand zones without manual chart work.
Its multi-timeframe capability and alert system help traders stay focused on high-probability areas.
With no repaint behavior and broad market compatibility, the indicator fits well into many trading styles.
When combined with sound trade confirmation, it can support consistent decision-making across different forex conditions.