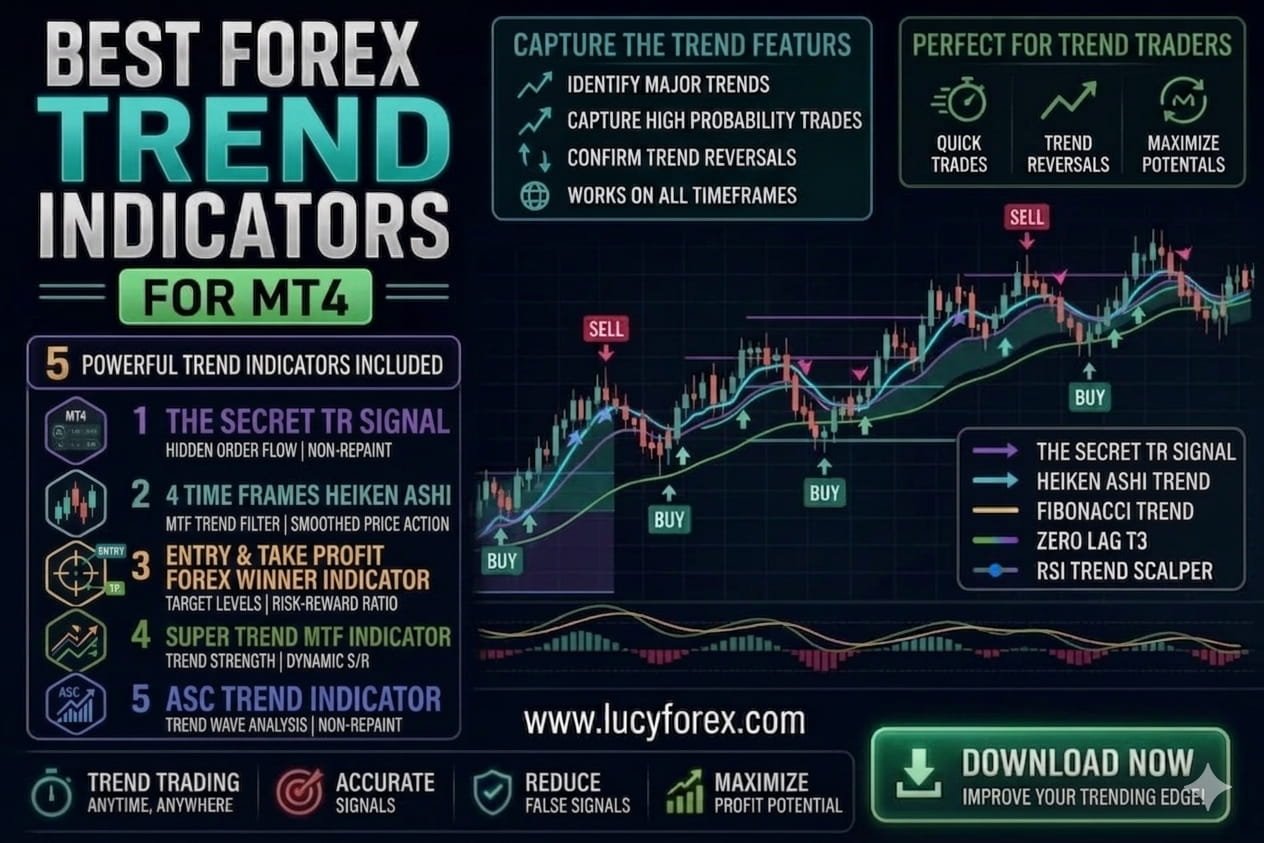
About the Indicator
The Custom BB MACD Indicator for MT4 delivers profitable buy and sell trading signals based on MACD and Bollinger Bands.
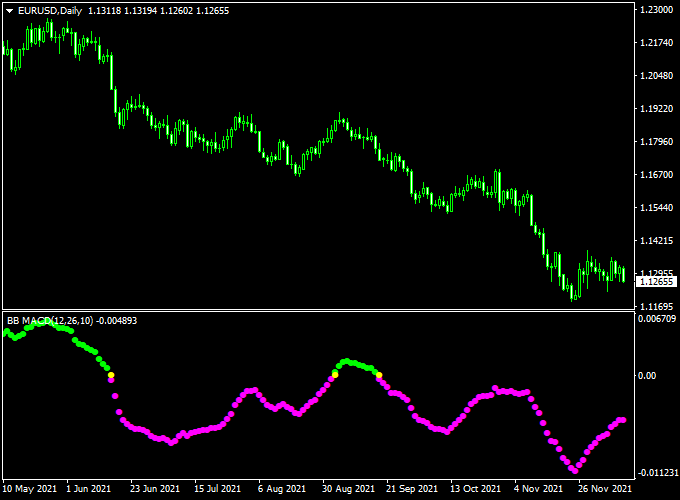
The indicator appears in a separate MT4 chart window as a colored signal line that oscillates above and below the 0.00 level.
Buying and selling currency pairs with the BB MACD indicator is a straightforward task:
- A buy signal occurs whenever the BB MACD indicator crosses the 0.00 level, bottom-up, and is green colored.
- A sell signal occurs whenever the BB MACD indicator crosses the 0.00 level top-down and is pink colored.
Free Download
Download the “custom-bb-macd-indicator.mq4” indicator for MT4
Key Features
- Histographic oscillator combining MACD and Bollinger Bands.
- Buy signal when the line crosses above 0 and turns green.
- Sell signal when it crosses below 0 and turns pink.
- Works on any currency pair and any timeframe.
- Reliable—no repainting in live trading conditions.
Indicator Example Chart (EUR/USD Daily)
The example chart below displays the Custom BB MACD MT4 indicator in action on the trading chart.
How To Trade Using This Indicator
Entry Logic
Enter long when the indicator crosses above zero and turns green. Go short when it crosses below zero and turns pink. These crossover events are your entry signals.
Stop Loss & Take Profit
Place stop loss just beyond recent swing points or use 1×ATR for dynamic risk management.
Exit when the signal reverses or upon achieving a 2R–3R reward.
Trailing stops with ATR can help lock in profits on strong moves.
Download Now
Download the “custom-bb-macd-indicator.mq4” indicator for Metatrader 4
Forex Strategy: Custom BB MACD + T3 Heiken Ashi Indicator
What This Strategy Is About
This strategy combines the Custom BB MACD Forex Indicator (MT4) with the T3 Heiken Ashi Indicator.
The Custom BB MACD blends Bollinger Bands and MACD to identify trend momentum and potential reversals, while the T3 Heiken Ashi smooths price action and provides clear buy and sell signals through colored candles and arrows.
Together, they form a powerful system for trend following and timely entries.
Buy Rules
- The Custom BB MACD histogram turns green above the zero level, signaling upward momentum.
- The T3 Heiken Ashi indicator shows a green upward arrow or bullish candles.
- Enter a long position at the close of the confirming candle.
- Place a stop loss just below the recent swing low.
- Set a take profit target based on a 2:1 reward-to-risk ratio or exit when the MACD histogram turns negative.
Sell Rules
- The Custom BB MACD histogram turns below the zero level and pink, indicating downward momentum.
- The T3 Heiken Ashi indicator shows a magenta downward arrow or bearish candles.
- Enter a short position at the close of the confirming candle.
- Place a stop loss just above the recent swing high.
- Set a take profit target based on a 2:1 reward-to-risk ratio or exit when the MACD histogram turns positive.
Trader Case Studies
Below are three examples of traders who applied this strategy across different markets and timeframes, demonstrating its versatility and effectiveness.
Emma T – Canada
Emma T, a swing trader from Toronto, used this strategy on the USD/CAD 4-hour chart. By following the combined signals, she achieved a total gain of +290 pips over 3 weeks, successfully managing risk and maximizing profits.
Kofi A – Ghana
Kofi A, a part-time trader from Accra, applied the strategy to the EUR/USD and GBP/USD pairs on the 1-hour timeframe. His disciplined approach resulted in net profits of +360 pips within 28 days.
Ming L – China
Ming L, a day trader based in Shanghai, traded the USD/JPY pair on the 15-minute chart. His quick entries and exits using this method generated +130 pips in just 5 trading days.
Disclaimer: These case studies are for educational purposes only. Trading results depend on market conditions, individual discipline, and risk management.
Advantages
- Combines trend momentum with smooth price action signals.
- Clear and timely entry/exit signals reduce confusion.
- Adaptable to multiple timeframes and currency pairs.
Drawbacks
- It may produce false signals during sideways markets.
- Requires patience to wait for confirming signals from both indicators.
Conclusion and Tips
By combining the Custom BB MACD with the T3 Heiken Ashi, traders can identify strong trends and execute well-timed trades.
The key is to wait for both indicators to align before entering a trade, which improves accuracy and risk management.
Use proper money management and avoid trading in choppy or low-volatility markets.
Indicator Specifications
| Platform | MT4 |
|---|---|
| Applicable Assets | Forex pairs, CFDs, stocks, indices, crypto |
| Timeframes | All (scalp to swing) |
| Type | MACD + Bollinger Bands oscillator |
| Repainting? | No |
| Inputs | Customizable via MT4 inputs tab: colors, line style, periods |
| Download | Free “custom-bb-macd-indicator.mq4” |
FAQ
1) When is it most effective?
Best used in trending markets. Add EMA200 or SuperTrend as a filter to reduce false signals in ranging conditions.
2) Can it support other strategies?
Yes. Use it to confirm breakouts and swing entries. It adds momentum alignment to your setup for better confidence.
3) How to avoid whipsaws?
Wait for a full bar close after the crossover before acting. Filtering with higher-timeframe trend direction also improves accuracy.
4) Which timeframes work best?
Scalpers: M1–M15; Day traders: M30–H1; Swing traders: H4–D1. Adjust stop/target sizing per your timeframe.
5) What’s a simple exit rule?
Exit on a color flip or return toward zero. Alternatively, use a defined risk-reward target (like 2R) or trailing stop via structure or ATR.
Conclusion
The Custom BB MACD Indicator offers clear, histogram-style momentum signals—great for both standalone entries and strategy reinforcement. It’s user-friendly, reliable, and free.
Final Words
Use it with a trend filter and proper risk rules to meet your trading style. Experiment in demo, refine your approach, and this tool can help sharpen your decision-making edge.