
About the Bollinger Bands In Separate Window Indicator
The Bollinger Bands In Separate Window indicator for Metatrader 4 is a practical variation of the classic Bollinger Bands tool.
Instead of plotting bands over price, this version opens in a bottom chart window, allowing traders to analyze volatility and momentum without cluttering the main trading chart.
By separating the Bollinger Bands calculation from price, traders gain more flexibility.
The main chart remains available for price action, trend tools, or support and resistance levels, while the lower window focuses entirely on band behavior and signal timing.
This setup is especially useful for traders who rely on multiple indicators and want better chart organization.
Bollinger Bands are widely used to measure volatility and potential market expansion.
This indicator converts that information into easy-to-follow buy and sell signals, making it suitable for both discretionary and rule-based trading approaches across different market conditions.
Free Download
Download the “bollinger-bands-bb-separate-window.ex4” MT4 indicator
Key Features
- Bollinger Bands displayed in a separate indicator window.
- Helps maintain a clean and readable main price chart.
- Provides straightforward buy and sell signal logic.
- Useful for volatility-based trade analysis.
- Compatible with other technical indicators.
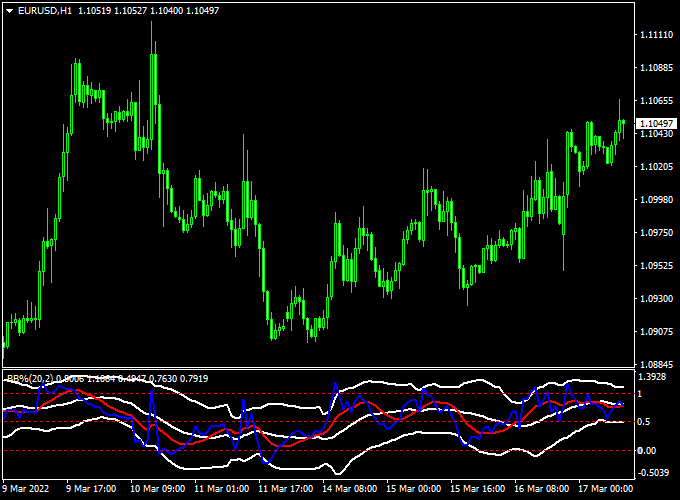
Indicator Chart
The Bollinger Bands In Separate Window indicator is plotted in a bottom chart window as a signal line derived from Bollinger Band behavior.
The chart highlights potential entry zones when the signal line reacts around key levels, helping traders assess momentum shifts and volatility changes without overlapping price candles.
Guide to Trade with Bollinger Bands In Separate Window Indicator
Buy
- Monitor the indicator window for the red signal line.
- Open a buy trade when the red line turns back above the 0.5 level.
- Confirm that price is holding above nearby support on the main chart.
Sell
- Watch for the red signal line to turn back below the 0.5 level.
- Open a sell trade after the signal is confirmed.
- Avoid selling directly into strong demand zones.
Stop Loss
- Place the stop loss 2 to 5 pips below trading support for buy trades.
- Place the stop loss 2 to 5 pips above trading resistance for sell trades.
- Widen stops slightly during high-volatility sessions.
Take Profit
- Exit buy trades near previous resistance levels.
- Exit sell trades near previous support levels.
- Partial profits can be taken when volatility starts to contract.
Bollinger Bands in Separate Window + Bykov Trend Signals Forex Scalping Strategy
This scalping strategy combines the Bollinger Bands in Separate Window Indicator for MT4 and the Bykov Trend Signals Indicator for MT4.
This setup is best used on timeframes between M5 and M15, and on major forex pairs with lower spreads such as EURUSD, USDJPY and AUDUSD.
Because this strategy focuses on quick trades, it is designed for scalping rather than holding trades overnight.
Buy Entry Rules
- Wait for the Bykov Trend Signals indicator to display an aqua arrow (bull‑trend confirmation).
- Then wait for the Bollinger Bands in the Separate Window indicator’s red signal line to turn back above the 0.5 level (momentum reversal/buy signal).
- Enter a buy trade at the close of the candle that confirms the above two signals.
- Set a stop loss around 8‑12 pips below the recent swing low (M5) or 12‑20 pips for M15, depending on the pair’s volatility.
- Take profit: Option A: target a small fixed amount (e.g., 15‑20 pips) given the scalping timeframe.
- Option B: Use a dynamic rule — for example, close half the trade at +10 pips and move the stop loss to breakeven, then aim for +20‑25 pips or close when the red signal line turns back below 0.5 or a magenta Bykov arrow appears.
Sell Entry Rules
- Wait for the Bykov Trend Signals indicator to display a magenta arrow (bear‑trend confirmation).
- Then watch the Bollinger Bands indicator’s red signal line to turn back below the 0.5 level (momentum reversal/sell signal).
- Enter a sell trade at the close of the confirming candle.
- Set a stop loss around 8‑12 pips above the recent swing high on M5 (or 12‑20 pips on M15 for more volatile pairs).
- Take profit: Option A: fixed target of 15‑20 pips.
- Option B: dynamic rule — close half at +10 pips, shift stop to breakeven, then aim for +20‑25 pips or exit when the red line turns back above 0.5 or an aqua Bykov arrow appears.
Advantages
- Combines volatility/momentum reversal (via Bollinger Bands indicator) with trend confirmation (via Bykov Trend Signals), improving trade quality.
- Simple visual cues and clear rules make it accessible for scalping, where quick decisions matter.
- Suitable for major currency pairs with tight spreads and high liquidity, which is ideal for scalpers.
- The dynamic profit‑taking rule allows both immediate capture and extended gain potential, depending on how the trade develops.
Drawbacks
- Frequent signals may lead to overtrading if discipline is lacking and setups are taken without full confirmation.
- Stop losses are tight by nature of scalping, which means slippage or spread spikes can adversely impact performance.
- Rapid execution is required — delays in execution or poor broker conditions can turn a valid setup into a loss quickly.
- Because of its quick nature, it requires full focus during the session — not suitable for “set and forget” trading or distracted screens.
Case Study 1 – EURUSD (M5 Chart)
During the London session, EURUSD showed an aqua arrow from the Bykov Trend Signals indicator confirming an uptrend.
Shortly after, the Bollinger Bands indicator’s red signal line crossed back above the 0.5 level.
A buy trade was entered at 1.1052 with a stop loss placed at 1.1040 (12 pips) and a take profit target set at +20 pips.
Within about 25 minutes, the pair moved to 1.1072, achieving the target.
The dynamic rule would have allowed moving stop to breakeven when +10 pips were reached and letting the rest run to +20 pips.
Case Study 2 – AUDUSD (M15 Chart)
In the New York session, AUDUSD triggered a magenta arrow from Bykov, indicating a bearish trend.
The Bollinger Bands red signal line then turned below 0.5, signalling a sell entry.
A short trade was placed at 0.6784 with a stop loss at 0.6796 (12 pips) and a target of +20‑25 pips via a dynamic take‑profit rule.
The pair declined to 0.6764 in about 30 minutes, realising +20 pips before consolidation set in.
Strategy Tips
- Only take trades when both indicator signals align (trend arrow + signal line reversal) — skip any one‑legged setups.
- Trade during high‑liquidity periods (London and New York sessions) to increase the probability of momentum follow‑through.
- Use major currency pairs with low spreads for scalping to reduce cost and slippage (e.g., EURUSD, USDJPY, AUDUSD, GBPUSD).
- Avoid exotic pairs unless you’re experienced with spread behaviour under scalping conditions.
- Consider reducing lot size or opting out during times of low volume (e.g., late U.S. or Sydney sessions) since false signals increase in quiet markets.
- Review performance regularly, track win/loss ratio, average pip gain, and adjust your dynamic take‑profit rule if needed based on pair behaviour.
Download Now
Download the “bollinger-bands-bb-separate-window.ex4” MT4 indicator
FAQ
Why use Bollinger Bands in a separate window?
Separating the indicator keeps the price chart uncluttered and allows better focus on volatility signals.
Is this indicator suitable for short-term trading?
Yes, it works well for scalping and intraday trading when combined with basic price analysis.
Can it be used in trending markets?
It can be used in trends, but traders should be cautious and align signals with the dominant direction.
Does this version replace traditional Bollinger Bands?
It does not replace them, but offers an alternative way to interpret Bollinger Band data.
Summary
The Bollinger Bands In Separate Window indicator for MT4 offers a cleaner and more organized way to trade volatility-based signals.
By moving the Bollinger Bands logic into a lower chart window, traders gain flexibility to combine it with other tools and price action techniques.
Its simple signal logic, broad usability, and compatibility with different strategies make it a useful addition for traders who value both functionality and chart readability.


