About the MA Crossover Histogram Signal Forex Indicator
The MA Crossover Histogram Signal indicator for MT4 is a moving average crossover system that visualizes signals as histogram bars in a separate chart window.
It makes spotting trend changes simple and intuitive.
The indicator plots a blue bar for buy signals and a red bar for sell signals.
Traders can see the exact moment the crossover occurs without needing to watch the moving averages directly.
MA Crossover Histogram Signal works on all currency pairs and multiple timeframes.
Free Download
Download the “MA_Crossover_Histogram.mq4” indicator for MT4
Key Features
- Signals appear as histogram bars in a separate window
- Blue bars indicate buy signals
- Red bars indicate sell signals
- Customizable moving averages for flexible strategies
- Works for multiple currency pairs and timeframes
- Can be combined with trend filters or support/resistance levels
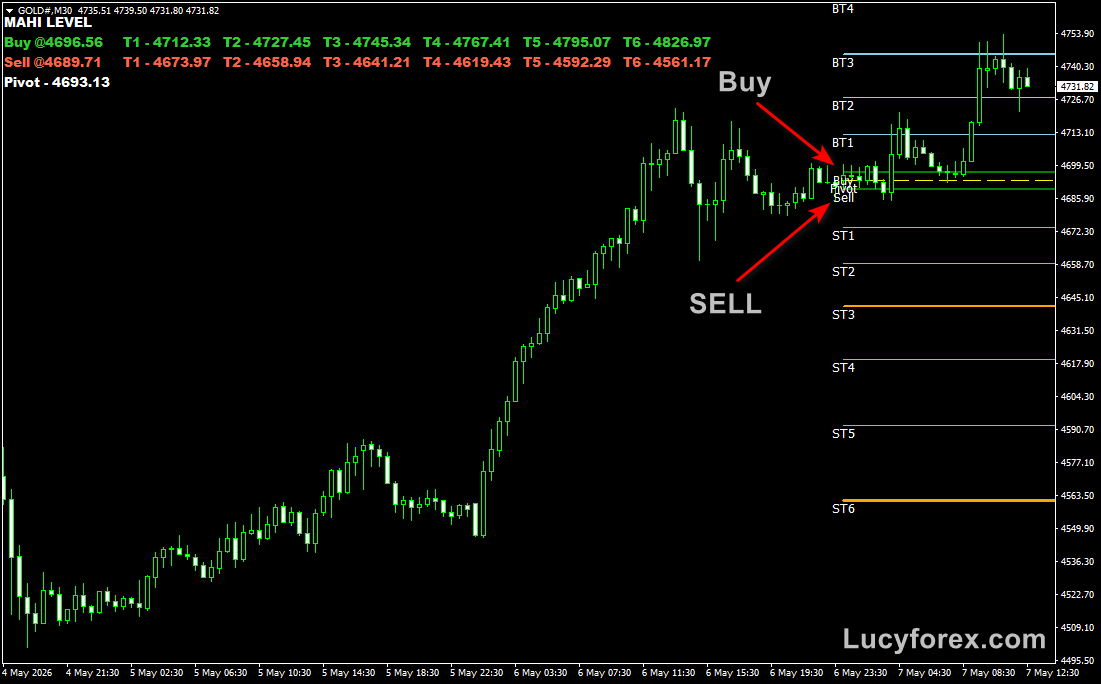
Indicator Chart
The MA Crossover Histogram Signal chart shows price action in the main window and signal bars in a separate histogram window below.
Blue bars appear when a buy signal triggers, and red bars appear for sell signals.
This visualization helps traders quickly identify crossover points and potential entries.

Guide to Trade with MA Crossover Histogram Signal Indicator
Buy Rules
- Wait for the first blue histogram bar to appear
- Confirm upward momentum or trend alignment
- Enter a buy trade at the close of the signal bar
Sell Rules
- Wait for the first red histogram bar to appear
- Confirm downward momentum or trend alignment
- Enter a sell trade at the close of the signal bar
Stop Loss
- Place a stop loss a few pips below the recent swing low for buys
- Place a stop loss a few pips above the recent swing high for sells
- Give more room during high-volatility sessions
Take Profit
- Close part of the trade when the histogram changes color
- Let the rest run to the next swing high for buys or swing low for sells
- Use a 1:2 or 1:3 risk-to-reward ratio if price continues strongly
- Adjust targets based on recent support and resistance levels
Practical Tips
- Best used on M5, M15, M30, or H1 charts
- Combine with higher timeframe trend checks for stronger signals
- Avoid trading during flat, sideways markets
MA Crossover Histogram + Supply and Demand Forex Trend Strategy for MT4
This strategy combines the MA Crossover Histogram Signal Indicator for MT4 with the Supply and Demand Metatrader 4 Forex Indicator to identify high-probability trend trades.
The MA Crossover Histogram provides visual buy and sell signals with blue bars indicating bullish momentum and red bars indicating bearish momentum.
The Supply and Demand indicator highlights key support and resistance zones with green horizontal blocks for demand (support) and red blocks for supply (resistance), helping traders identify areas where price may reverse or continue the trend.
Why this strategy works
The combination of momentum and key price levels allows traders to enter trades in the direction of the prevailing trend while avoiding entering at weak or potentially reversing zones.
The MA Crossover Histogram identifies the trend’s momentum, while the Supply and Demand indicator helps to time entries and exits around strong market zones.
Buy Entry Rules
- Look for a blue bar on the MA Crossover Histogram indicating bullish momentum.
- Confirm that the price is above a green demand zone or approaching it without breaking it.
- Enter a buy trade at the open of the next candle after both conditions are met.
- Place the stop loss below the nearest demand zone or swing low.
- Set a take profit near the next red supply zone or based on a risk-reward ratio of 1:2 or 1:3.
- Exit the trade early if the MA Crossover Histogram turns red or price approaches a strong resistance zone.
Sell Entry Rules
- Look for a red bar on the MA Crossover Histogram indicating bearish momentum.
- Confirm that the price is below a red supply zone or approaching it without breaking it.
- Enter a sell trade at the open of the next candle after both conditions are met.
- Place the stop loss above the nearest supply zone or swing high.
- Set a take profit near the next green demand zone or based on a risk-reward ratio of 1:2 or 1:3.
- Exit the trade early if the MA Crossover Histogram turns blue or price approaches a strong support zone.
Advantages
- Combines momentum with key supply and demand zones for precise trend entries.
- Helps traders avoid false breakouts and entries at weak price levels.
- Can be applied across all timeframes and currency pairs.
- Works well in trending and strong directional market conditions.
Drawbacks
- Price can occasionally break supply or demand zones, triggering stop losses.
- Requires monitoring of both histogram momentum and zone levels simultaneously.
- Trades may require manual adjustment if market conditions change rapidly.
Case Study 1 – EUR/JPY H1
During the London session, EUR/JPY showed a blue bar on the MA Crossover Histogram while the price approached a green demand zone at 152.30.
A buy trade was entered at 152.35 with a stop loss at 152.20 and a take profit near the next supply zone at 152.80.
The trade followed the trend and reached the target in a few hours, yielding 45 pips.
The combination of momentum and a strong demand zone ensured a high-probability entry.
Case Study 2 – GBP/USD H1
Later in the New York session, GBP/USD showed a red bar on the MA Crossover Histogram while the price neared a red supply zone at 1.2650.
A sell trade was entered at 1.2645 with a stop loss at 1.2660 and a take profit near the next demand zone at 1.2590.
The trade hit the target in 90 minutes for a 55-pip gain.
Using both indicators together prevented entering during minor retracements and confirmed the trend.
Strategy Tips
- Use higher timeframes like H1 or H4 for trend trades to filter noise.
- Focus on currency pairs with strong trending behavior for better performance.
- Consider adjusting take profit levels according to the strength of supply or demand zones.
- Combine with fundamental news awareness to avoid entering trades during volatile announcements.
- Monitor histogram signals closely to exit trades if momentum weakens before reaching target zones.
Download Now
Download the “MA_Crossover_Histogram.mq4” indicator for Metatrader 4
FAQ
Do histogram signals repaint?
No. Once the histogram bar appears after the candle close, it remains fixed.
This ensures accurate tracking of buy and sell signals.
Can I adjust the moving average periods?
Yes. Shorter periods give more frequent signals, while longer periods provide more reliable trend confirmations.
Experiment to match your trading style.
Summary
The MA Crossover Histogram Signal MT4 indicator simplifies trading moving average crossovers by displaying clear histogram bars.
Blue bars indicate buy opportunities, and red bars signal potential sells.
It is a versatile tool suitable for multiple currency pairs and timeframes.
The separate histogram window keeps the main chart clean, making entries and exits easier to track.
With proper risk management and trend alignment, the indicator can be used as a standalone system or to enhance existing strategies.
Its visual simplicity and reliability make it a practical choice for traders of all levels.