About the Double Zero Visualizer Indicator
Double Zero Visualizer is a free MT4 (Metatrader 4) indicator that identifies and displays the double zero visualizer trading algorithm on the chart.
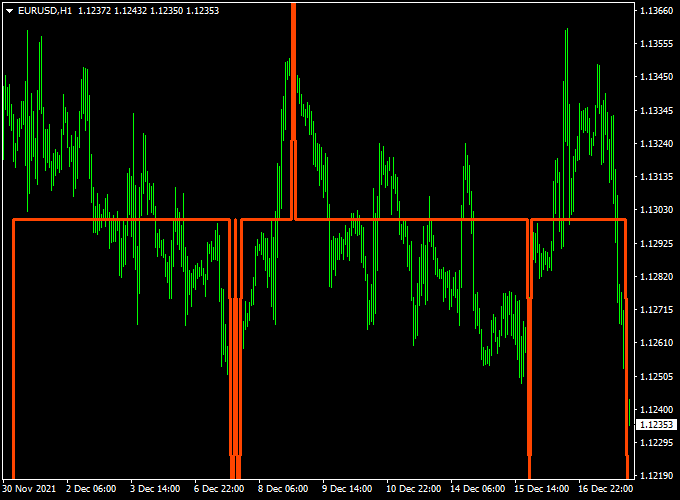
The indicator appears in the main MT4 chart window in the form of a red colored signal line.
The Double Zero Visualizer indicator can be used to find trade entries and exits, or to confirm buy & sell trade setups issued by your favorite trading systems or strategies.
For scalping purposes, the indicator tends to work the best during the London and American trading sessions.
Free Download
Download the “double-zero-visualizer.mq4” indicator for MT4
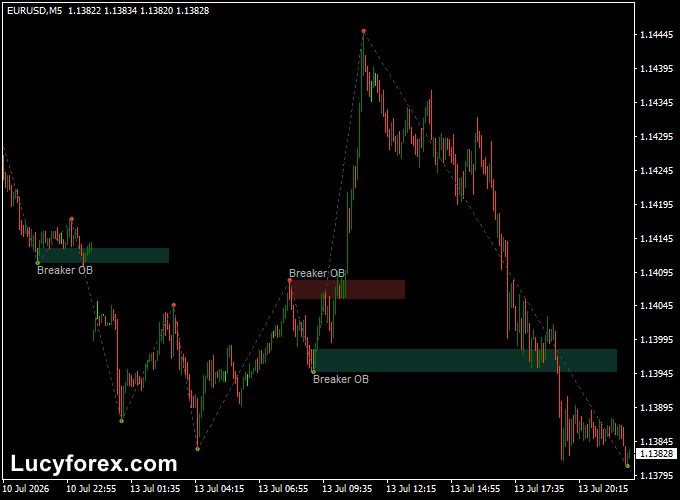
Indicator Example Chart (EUR/USD H1)
The example chart below displays the Double Zero Visualizer mt4 indicator in action on the trading chart.

Double Zero Visualizer + Awesome Oscillator MT4 Strategy
This MT4 strategy combines the Double Zero Visualizer for clear price zones with the Awesome Oscillator for momentum confirmation.
The Double Zero Visualizer highlights key round-number areas and structural levels.
The Awesome Oscillator shows momentum shifts and helps time entries. Together, they filter noise and find high probability moves.
Intro
Use this strategy on H1 and H4 for swing trades and on M30 for intraday setups.
It works best for traders who prefer clear rules and small position sizes. The method relies on price respecting round levels and on momentum confirming direction.
You must manage risk and test on a demo before trading live.
Buy Entry Rules
Entry
- Wait for the price to touch or form a bullish rejection candle at a Double Zero level or zone.
- The rejection can be a pin bar, engulfing candle, or a clear wick rejection.
- Confirm with the Awesome Oscillator turning from red to green with at least one green bar above the zero line or crossing toward it.
Stop Loss
- Place stop loss below the rejection candle low or a fixed distance below the Double Zero level, whichever is wider.
- For H1 trades, use 30–60 pips. For H4 use 80–150 pips. Adjust the size so the risk is 1–2% of the account per trade.
Take Profit
- Target the next major Double Zero level or a 1.5:1 to 3:1 reward-to-risk ratio.
- For swing trades, consider partial profit at the first level and trail the rest with a break-even plus buffer.
- Use ATR to size targets if you prefer dynamic exits.
Sell Entry Rules
Entry
- Wait for the price to reach a Double Zero level and display a bearish rejection candle.
- Confirm with the Awesome Oscillator turning from green to red or showing a clear bearish histogram below the zero line.
Stop Loss
- Place a stop loss above the rejection candle high or above the Double Zero level.
- For H1, use 30–60 pips. For H4 use 80–150 pips. Keep risk consistent per trade.
Take Profit
- Target the next lower Double Zero level or aim for 1.5:1 to 3:1 reward to risk.
- Consider scaling out on the way to lock profits and reduce exposure as the trade moves in your favor.
Advantages
- The strategy uses objective levels. Round numbers are widely respected by price and create reliable support and resistance.
- Momentum confirmation from the Awesome Oscillator reduces false breakouts. Entries become cleaner and easier to manage.
- It works across timeframes, so you can trade your preferred style without changing rules.
Drawbacks
- Round levels sometimes cause congestion. You may see choppy price action around the level before a clear rejection forms.
- On very strong trends, the indicator confirmation may lag and cause missed entries. You must accept that not every move will be captured.
- Requires discipline. Waiting for both level and momentum confirmation reduces the number of signals.
Example Case Study 1 — H4 EUR/USD Long
Price retraced to the 1.1200 Double Zero level and formed a bullish engulfing candle.
The Awesome Oscillator changed from red to green and printed its first green bar above zero.
Entry was placed at the close of the engulfing candle.
Stop loss sat 95 pips below the entry under the candle low.
Take profit targeted at 250 pips higher at the next round level.
The trade hit the first target, and the remainder trailed to break even, then to the final target.
The net result was +210 pips on the position.
Example Case Study 2 — M30 GBP/JPY Short
On M30, the pair rallied to 155.00 and formed a clear shooting star at the Double Zero zone.
The Awesome Oscillator shifted from green to red below zero.
Entry was on the next candle close.
Stop loss was 45 pips above the high.
Take profit used a 2:1 reward-to-risk ratio. Price moved quickly, and the trade closed at the target for +90 pips.
The setup worked because momentum confirmed the rejection at a significant round level.
Strategy Tips
Always wait for both the level reaction and the oscillator confirmation. One without the other weakens the edge.
Use proper position sizing. Risk per trade should remain small until you validate the setup on your instruments.
Combine the H4 or H1 bias with M30 entries. Identify the trend on H4, then look for pullback rejections on M30 for finer entries.
Keep a trading journal. Note entry reason, oscillator behavior, candles, and result. Over time, this data improves your edge.
Finally, backtest the setup on the pairs you trade most. Markets behave differently. Adjust stop and target distances to match volatility.
Download Now
Download the “double-zero-visualizer.mq4” indicator for Metatrader 4
Indicator Specifications
| Specification | Detail |
|---|---|
| Platform | MetaTrader 4 (MT4) |
| File type | MQ4 / EX4 (indicator file) |
| Timeframes | All timeframes — M1 to D1 |
| Pairs | Forex majors, minors, and cross pairs |
| Inputs | Levels above/below, sensitivity, label toggle, alerts on touch, line style |
| Default settings | Optimized for major pairs like EURUSD, GBPUSD, USDJPY |
| License | Free download for personal use; read site terms for redistribution |
FAQ
Do double-zero levels always work?
No single concept always works. Double-zero levels are psychologically important and often cause reactions, but they should be used with confirmation tools and proper risk management.
Which symbols are best?
Major currency pairs with tight spreads like EURUSD, GBPUSD, and USDJPY are ideal.
Pairs with high volatility can still use the indicator, but may need wider reaction bands and larger stops.
Summary
The Double Zero Visualizer is a simple and effective tool for traders who want to quickly identify and trade around round-number price levels.
It reduces the visual clutter of manual level drawing and helps you plan entries, stops, and targets with greater confidence.
Use it alongside trend filters and price action confirmation to increase the probability of success.