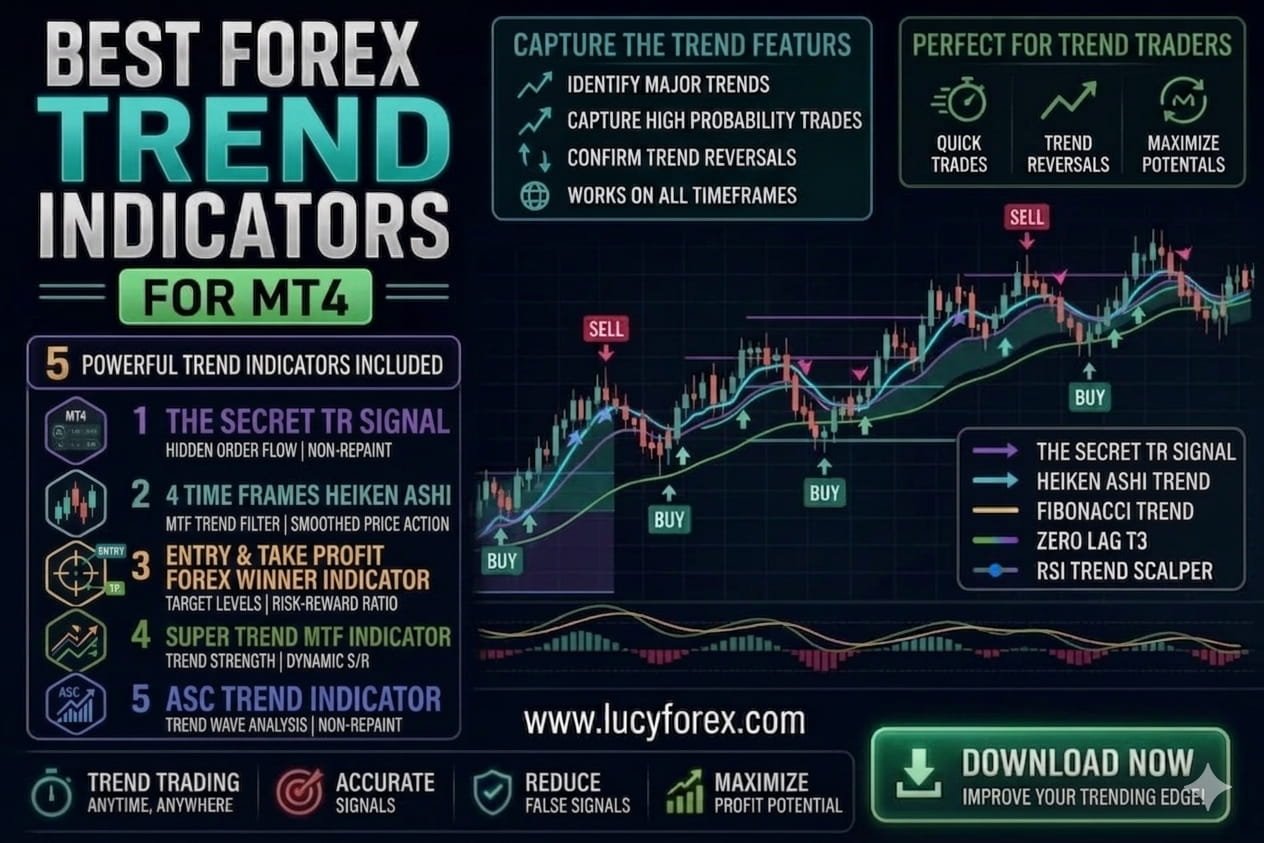
About the Gold Signal Indicator
The Gold Signal indicator for MT4 is designed exclusively for trading Gold and provides clear entry and target levels directly on the platform.
The indicator is built around a central pivot level and generates dedicated buy and sell entry zones to help traders identify potential market direction with ease.
It also includes six target levels for each trade setup, allowing traders to manage profits step by step while following the ongoing Gold trend.
The indicator works well for intraday trading and helps simplify decision-making during active market sessions.
Key Features
- Designed exclusively for Gold trading on MT4
- Displays a central pivot level for market direction
- Provides dedicated buy and sell entry levels
- Includes 6 target levels for buy trades
- Includes 6 target levels for sell trades
- Helps traders manage profits step by step
- Works well for intraday Gold trading
- Simple and easy-to-read chart layout
Free download
Download the “GOLD Signal Indicator MT4” indicator
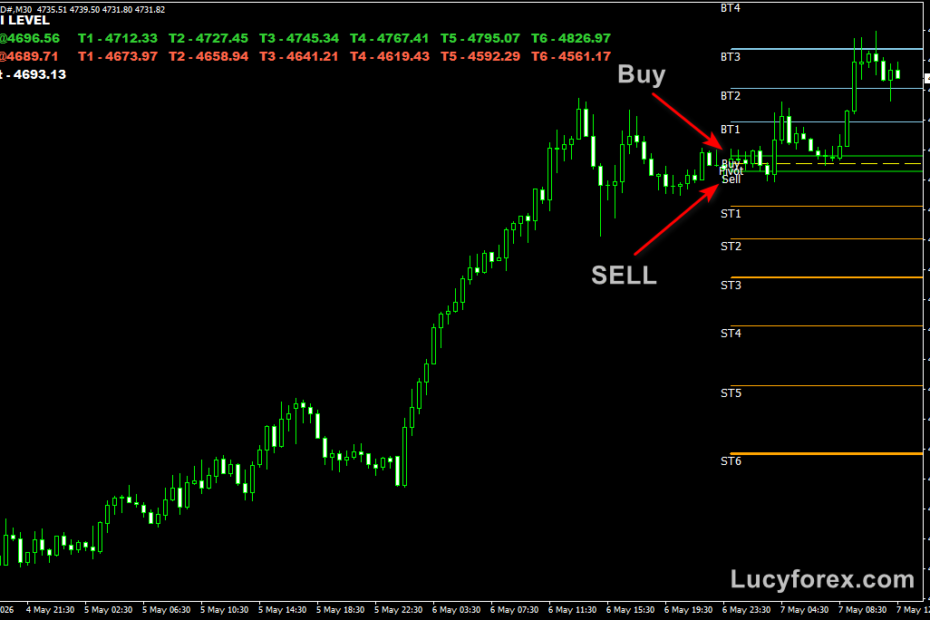
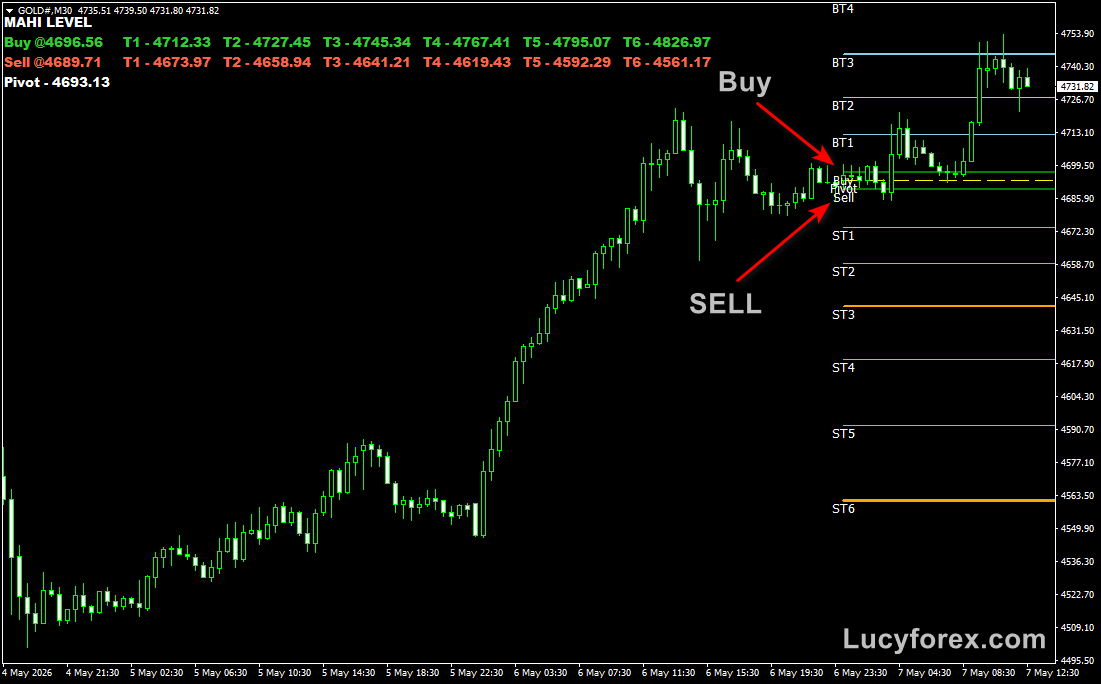
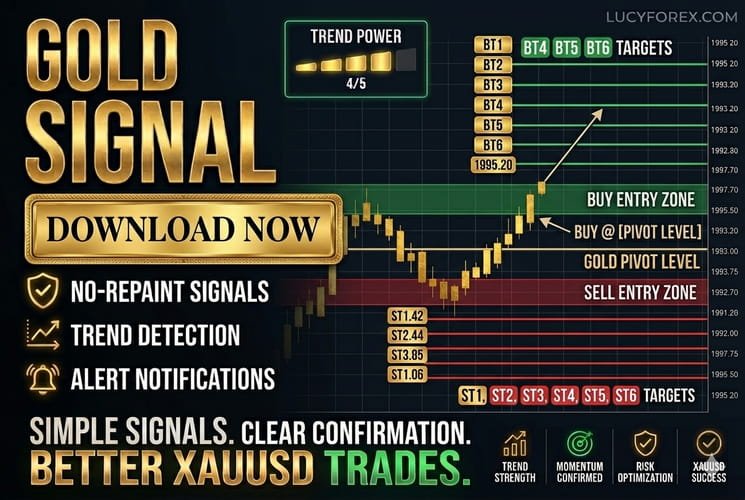
Trading Chart
Below is an example of the Gold Signal indicator applied to the Gold M30 timeframe. The green lines mark the buy and sell entry points.
BT1 to BT6 represent the target levels for buy trades, while ST1 to ST6 show the target levels for sell trades.
Guide to Trade with Gold Signal Indicator
Buy Rules
- Wait for the price to move above the Gold Pivot level.
- Open a buy trade when price reaches the green buy entry level line.
- Confirm that the market is maintaining bullish momentum before entering.
Sell Rules
- Wait for the price to move below the Gold Pivot level.
- Open a sell trade when price reaches the green sell entry level line.
- Confirm that the market is maintaining bearish momentum before entering.
Stop Loss
- For buy trades, place the stop loss below the Gold Pivot level.
- For sell trades, place the stop loss above the Gold Pivot level.
- Adjust the stop loss to breakeven after the first target level is reached.
Take Profit
- For buy trades, take partial profits at BT1, BT2, BT3, BT4, BT5, and BT6.
- For sell trades, take partial profits at ST1, ST2, ST3, ST4, ST5, and ST6.
- Close the remaining position at the final target level or when the market reverses.
Gold Signal Indicator Trading Strategy with EMA 200 Confirmation
The Gold Signal Indicator Trading Strategy with EMA 200 Confirmation combines the Gold Signal indicator with the 200 Exponential Moving Average (EMA) to filter trades in the direction of the main trend.
The strategy focuses on trading Gold setups that align with long-term market momentum while using the indicator’s entry and target levels for trade execution and profit management.
The EMA 200 acts as a trend filter.
Buy trades are only taken when the price is above the EMA 200, while sell trades are only taken when the price is below the EMA 200.
This helps traders avoid counter-trend entries and improves trade quality during trending market conditions.
Strategy Setup
- Indicator 1: Gold Signal Indicator
- Indicator 2: EMA 200
- Trading Asset: Gold (XAUUSD)
- Recommended Timeframes: M15, M30, H1
Buy Rules
- Wait for the price to trade above the EMA 200.
- Confirm that the price is also above the Gold Pivot level.
- Open a buy trade when price reaches the green buy entry level line.
- Enter the trade only if bullish momentum remains active.
Sell Rules
- Wait for the price to trade below the EMA 200.
- Confirm that the price is also below the Gold Pivot level.
- Open a sell trade when price reaches the green sell entry level line.
- Enter the trade only if bearish momentum remains active.
Stop Loss
- For buy trades, place the stop loss below the Gold Pivot level or below the recent swing low.
- For sell trades, place the stop loss above the Gold Pivot level or above the recent swing high.
- Move the stop loss to breakeven after the first target level is reached.
Take Profit
- For buy trades, secure partial profits at BT1, BT2, BT3, BT4, BT5, and BT6.
- For sell trades, secure partial profits at ST1, ST2, ST3, ST4, ST5, and ST6.
- Close the remaining position at the final target level or if price crosses back over the EMA 200.
Case Study 1 – Gold Buy Trade
Gold price moved above the EMA 200 and stayed above the Gold Pivot level during the London session.
A bullish setup appeared when price reached the green buy entry line.
A buy trade was opened with the stop loss placed below the Gold Pivot level.
The market continued higher and reached BT1 and BT2 within the next hour, where partial profits were secured.
Two hours later, price advanced toward BT4 and the stop loss was moved to breakeven.
The trade was finally closed near BT6 after bullish momentum started slowing down.
Case Study 2 – Gold Sell Trade
Gold price traded below the EMA 200 and remained under the Gold Pivot level during the New York session.
A bearish setup formed when price touched the green sell entry line.
A sell trade was opened with the stop loss placed above the Gold Pivot level.
Price dropped steadily and reached ST1 and ST2 shortly after the entry, allowing partial profits to be secured.
Later in the session, Gold continued lower toward ST5 while bearish pressure remained active.
The remaining position was closed near ST6 after the market started showing signs of reversal.
Download Now
Download the “GOLD Signal Indicator MT4” indicator
FAQ
What is the Gold Signal Indicator for MT4?
It is a Gold trading indicator that provides a pivot level, buy/sell entry zones, and six target levels to help traders manage trades directly on the chart.
How do I enter a trade using the indicator?
Buy trades are opened when price reaches the green buy level above the Gold Pivot. Sell trades are opened when price reaches the green sell level below the pivot.
How are profits taken with this indicator?
Profits are taken in stages at BT1 to BT6 for buy trades and ST1 to ST6 for sell trades, allowing partial exits as price moves toward the final target.
Summary
The Gold Signal Indicator for MT4 is a Gold-focused trading tool that displays a central pivot level, clear buy and sell entry zones, and six target levels for each direction directly on the chart.
It helps traders quickly spot trading opportunities on Gold without using extra indicators.
Buy signals appear when price reaches the green buy level above the Gold Pivot, while sell signals trigger at the green sell level below the pivot.
Trades are managed by taking partial profits at BT1–BT6 for buys and ST1–ST6 for sells, allowing structured exits and simple trade management.