About the Forex Spread Screener Dashboard Indicator
The Forex Spread Screener Dashboard Indicator for MT5 shows real-time spreads for all selected currency pairs in an easy-to-read dashboard.
Traders can quickly identify pairs with low spreads for better trading conditions.
Clicking any currency pair in the dashboard opens its chart instantly.
The indicator also shows the time remaining until the next candle forms, helping traders time entries and exits more precisely.
It works on all time frames and supports all instruments available on the MT5 platform.
You can customize which pairs to monitor and adjust display options to suit your preferences.
Free Download
Spread Screener and Candle Timer for MT5.mq5 Indicator (MT5)
Key Features
- Displays real-time spreads for selected currency pairs.
- Shows a countdown to the next candle formation.
- Click any pair to open its chart instantly.
- Customizable pairs list, prefix, and suffix.
- Adjustable display settings, colors, and box layout.
- Supports all MT5 instruments and time frames.
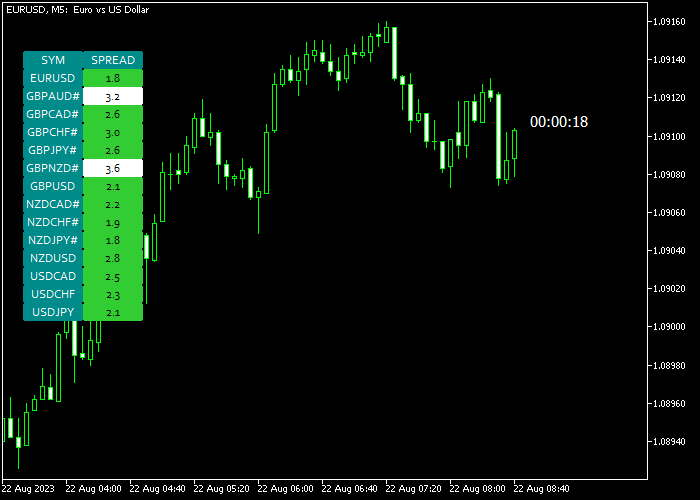
Indicator Chart
The indicator shows a live table with spreads for all monitored pairs.
Green highlights indicate low spreads, while red indicates high spreads.
The countdown timer shows time until the next candle closes, helping traders anticipate price movement and plan entries efficiently.
Guide to Use the Spread Screener Dashboard Indicator
Setup Rules
- Open the indicator’s inputs menu.
- Add or remove currency pairs to monitor.
- Adjust prefix and suffix if your broker uses them.
- Set high and low spread levels to highlight favorable conditions.
Usage Rules
- Monitor the dashboard for pairs with the lowest spreads.
- Click any pair to open its chart quickly.
- Watch the candle countdown to time entries and exits.
- Combine with your trading strategy for better spread efficiency.
Forex Spread Scalping Strategy MT5
This strategy combines precision entries with cost efficiency by using the Forex Spread Screener Dashboard Indicator for MT5 and the Xmaster Formula Indicator for MT5.
It focuses on short-term scalping where tight spreads and fast signals matter most.
The Forex Spread Screener Dashboard Indicator shows real-time spreads for all selected currency pairs in a clear dashboard.
This helps you quickly pick pairs with the lowest trading costs.
The Xmaster Formula Indicator generates precise entry signals using a green line for buy setups and a red line for sell setups.
This strategy works best on the M1 to M5 timeframes. It fits traders who prefer fast-paced execution and short holding periods.
By combining low spread selection with clear entry signals, the strategy improves both timing and efficiency.
Buy Entry Rules
- Select currency pairs with the lowest spreads using the Forex Spread Screener Dashboard Indicator.
- Wait for the Xmaster Formula Indicator to display a green line.
- Enter a buy trade immediately after the green signal appears.
- Place stop loss slightly below the most recent short-term low.
- Close the trade fully when the Xmaster Formula Indicator switches to a red line or secure profits near a resistance level.
Sell Entry Rules
- Choose pairs that show tight spreads on the Forex Spread Screener Dashboard Indicator.
- Wait for the Xmaster Formula Indicator to show a red line.
- Enter a sell trade right after the red signal forms.
- Place stop loss slightly above the most recent short-term high.
- Close the trade completely when the Xmaster Formula Indicator turns green or take profit near a support level.
Case Study 1: EURUSD Scalping Trade
During the London session, the Forex Spread Screener Dashboard Indicator highlights EURUSD as one of the lowest spread pairs.
This confirms ideal scalping conditions.
The Xmaster Formula Indicator prints a green line on the M1 timeframe. A buy trade is opened immediately.
Price moves upward quickly while trading costs remain minimal.
The position is closed for 13 pips when the Xmaster Formula Indicator switches to a red line, capturing a fast profit.
Case Study 2: GBPUSD Quick Sell Setup
The Forex Spread Screener Dashboard Indicator shows GBPUSD with a favorable spread during active market hours. This ensures efficient execution.
The Xmaster Formula Indicator displays a red line on the M5 timeframe.
A sell trade is placed as downward momentum builds.
Price declines steadily, and the trade is closed for 22 pips once the Xmaster Formula Indicator flips back to green, securing a clean scalping gain.
Download Now
Spread Screener and Candle Timer for MT5.mq5 Indicator (MT5)
FAQ
Can I monitor all currency pairs at once?
Yes, you can add as many pairs as you want in the inputs menu. Adjust box size and layout for readability.
Does the spread update in real time?
Yes, the dashboard refreshes spreads continuously, showing the current market condition for each selected pair.
Which time frames are supported?
All time frames are supported, from M1 to H4, as well as daily charts. The countdown timer works on any selected frame.
Is it compatible with other indicators?
Yes, it can be used alongside any MT5 indicator. The dashboard only displays spreads and candle countdown, so it won’t interfere with other tools.
Summary
The Forex Spread Screener Dashboard Indicator for MT5 helps traders find low-spread currency pairs quickly.
The live dashboard and candle timer provide useful real-time information for better trading decisions.
Customizable settings let you focus on preferred pairs and market conditions.
Using the indicator alongside your trading strategy makes it easier to enter trades efficiently while staying aware of spread fluctuations.