
About the STARC Bands Indicator
The STARC Bands Indicator for MT5 is built around Stoller Average Range Channels, a volatility-based tool developed by Manning Stoller.
It forms a three-line channel around price using a Simple Moving Average and ATR-derived bands that expand and contract with market conditions.
The middle line is an n-period SMA, while the upper and lower bands are calculated by adding or subtracting an ATR value multiplied by a constant factor.
This creates a dynamic range that reflects typical price movement. When volatility rises, the bands widen. When volatility falls, the bands contract.
Traders use STARC Bands to assess risk levels, identify breakout opportunities, and anticipate reversal zones.
By monitoring how price interacts with the central line and the outer bands, traders can spot trend strength, exhaustion, and momentum shifts more effectively.
Free Download
Key Features
- Three-line channel constructed using SMA and ATR calculations.
- Bands expand and contract based on volatility changes.
- Middle band serves as a directional guide for trend bias.
- Helps identify breakouts, reversals, and overextended moves.
- Useful for managing risk during volatile conditions.
- Smooths market noise for clearer trend interpretation.
Indicator Chart
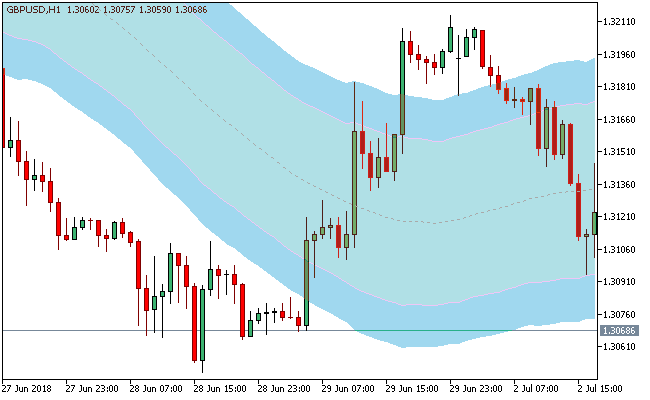
The STARC Bands Indicator appears as a central SMA with upper and lower ATR-based channels.
Price movement around the middle line highlights trend direction, while interaction with the outer bands signals potential reversal or breakout areas.
Guide to Trade with STARC Bands Indicator
Buy Rules
- Enter a buy trade when price opens and closes above the middle band.
- Ensure that price is gaining strength above the SMA.
- Look for increasing momentum supporting the upward move.
- Avoid long trades if price is too close to the upper band.
Sell Rules
- Enter a sell trade when price opens and closes below the middle band.
- Confirm weak momentum pushing price lower.
- Look for steady movement away from the SMA.
- Avoid short trades if price sits near the lower band without momentum.
Stop Loss
- Set stop loss just outside the opposite STARC band.
- For buy trades, place the stop below the lower band.
- For sell trades, place the stop above the upper band.
- Adjust stop size according to current ATR values to match volatility.
Take Profit
- Close all buy trades when the candle closes back below the middle band.
- Close all sell trades when the candle closes back above the middle band.
- Alternatively, target the nearest outer STARC band.
- Use a fixed profit target aligned with your trading plan.
STARC Bands MT5 Day Trading Strategy with Alpha Trend Spotter Price Action
This strategy combines volatility boundaries with directional price action to define precise intraday entries.
The STARC Bands indicator highlights price extremes, while the Alpha Trend Spotter Price Action indicator confirms clear directional signals.
This method fits traders who operate on M15 and M30 timeframes during active sessions such as London and New York.
It performs best on liquid pairs like EURUSD and GBPUSD where price respects volatility ranges.
The logic is simple. Trade reversals from statistical extremes only when directional confirmation appears.
Buy Entry Rules
- Price reaches or moves slightly below the lower STARC band while the bands start to rise.
- A green arrow from Alpha Trend Spotter appears after the reaction from the lower band.
- Enter a buy trade at the close of the signal candle.
- Place stop loss below the recent swing low or below the lower STARC band.
- Close the trade when a magenta arrow appears from Alpha Trend Spotter.
Sell Entry Rules
- Price reaches or moves slightly above the upper STARC band while the bands start to fall.
- A magenta arrow from Alpha Trend Spotter appears after the reaction from the upper band.
- Enter a sell trade at the close of the signal candle.
- Place stop loss above the recent swing high or above the upper STARC band.
- Close the trade when a green arrow appears from Alpha Trend Spotter.
Case Study 1: EURUSD M15 Day Trade
During the London session on EURUSD M15, price dropped into the lower STARC band while the bands started to turn upward.
A green arrow from Alpha Trend Spotter appeared after the rejection.
A buy trade was opened at candle close with a stop loss set below the recent low.
Price moved upward for the next hour.
A magenta arrow then appeared from Alpha Trend Spotter, and the trade was closed as the Alpha Trend Spotter signaled a bearish shift.
Case Study 2: GBPUSD M30 Day Trade
On GBPUSD M30, price pushed above the upper STARC band while the bands were sloping downward.
A magenta arrow from Alpha Trend Spotter appeared after the rejection.
A sell trade was opened at candle close with the stop loss placed above the recent high.
After 4 hours, a green arrow appeared from Alpha Trend Spotter, and the short trade was closed as the Alpha Trend Spotter signaled bullish pressure.
Download Now
FAQ
How do the STARC Bands differ from Bollinger Bands?
STARC Bands use ATR to adjust band width based on volatility, while Bollinger Bands rely on standard deviation.
This gives STARC Bands a more stability-focused response in trending markets.
What does a close above or below the middle band indicate?
A close above the central SMA suggests bullish strength. A close below it indicates bearish pressure.
Traders often use this level to trigger entries.
Are STARC Bands effective for reversals?
Yes, interaction with the outer bands often signals exhaustion.
When combined with strong price action patterns, these areas can highlight reversal opportunities.
Can I use STARC Bands for intraday trading?
The indicator performs well on intraday timeframes because it adapts to real-time volatility changes, making it easier to manage risk and identify precise entries.
Summary
The STARC Bands Indicator offers a practical way to analyze volatility and spot reliable trend setups.
Its SMA-ATR construction adapts to changing market conditions, giving traders a clearer view of directional strength.
The middle band provides simple and effective trade triggers, while the outer bands highlight exhaustion and risk zones.
This makes the tool valuable for both momentum and reversal strategies.